

I posted the instructions and pictures and they followed along.
I do this on another forum so we thought we might try it on crafters companion for a change.
You can see the girls finished card HERE
I have posted the instructions and photos below if anyone else would like to have ago.
please lave a comment and link to your blog as we would love to come see
Live crafting
Ingredients
A4 card - this will be for your base card
Two pattern papers,- I have used 12x12 scrapbook papers, but you could use A4 papers but you might need 2 of each.
Two images - that are the same or matching, this can be stamped image or you can print your own, keep them to a size that would fit onto an A6 size card
Ribbon -18 inches in length.
Embellishment of your choice
I always like to mat up my pattern papers, so if you would also like to do this, you will need another 12x12 or two A4 sized contrasting card to make your mats
Step 1
Take your A4 Base card score at Half fold A4, then turn and score again at half fold A4, cut across second fold line, We are making a 6 inch square card base, keep the bit you cut off for later.
 Step 2
Take your first pattern paper and we want two pieces.
Cut both pieces to this size 5 ½ inches x 5 ½ inches or 14cm x14cm.
.JPG) Step 3
Step 3Put one piece aside we will use this later, stick the cut pattern paper to the front of your base card, like this

Step 4
Take the second pattern paper; we want to get two pieces from this paper.
The first piece again cut this again to 5 ½ inches x 5 ½ inches or 14cm x14cm.
The second piece cut to 6inches x 2 ½ inches or 6½ cm x 14½ cm
See photo

Step 5
Take the smaller piece of the second pattern paper; across the back put a strip of double-sided tape, lay your ribbon across this to secure then bring it to the front and tie, like photo

Step 6
Stick to your base card like this

 Step 8
Take the left over strip that you had when you first made your base card, and cut in half, then stick this onto your centre pages, you can have it going horizontal or vertical I will leave it up to you, trim the edges to fit the card if needed.this is now the finished base of your card

Step 9
Now the fun bit colour your image if needed you can also mat it up if you like, add to your card, one image on the front and add the second image to the inside pages, decorate with embellishments and sentiments of your choice.
Take the smaller piece of the second pattern paper; across the back put a strip of double-sided tape, lay your ribbon across this to secure then bring it to the front and tie, like photo

Step 6
Stick to your base card like this

Step 7
Take the two large pieces of pattern papers, open your card, and stick one on each side; I will leave it up to you, which goes on what side
 Step 8
Take the left over strip that you had when you first made your base card, and cut in half, then stick this onto your centre pages, you can have it going horizontal or vertical I will leave it up to you, trim the edges to fit the card if needed.this is now the finished base of your card

Step 9
Now the fun bit colour your image if needed you can also mat it up if you like, add to your card, one image on the front and add the second image to the inside pages, decorate with embellishments and sentiments of your choice.
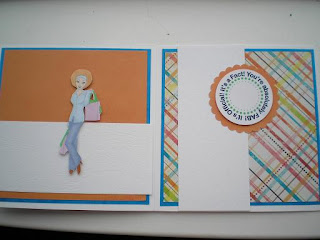
Here is my finished card


Well done Wendy. I did check this out on the forum but was too late to join in. Will have to give it a go next time.
ReplyDeleteLove, Pat xx
I read this after the event, but looks like it was a fun thing! might have to join you all in the next one
ReplyDeletetake care
Nicki
x